INSTRUCTIONS
THE PURPOSE OF THE DOCKING FORK IS TO AID IN THE PROCESS OF SECURING
YOUR LINES WHILE DOCKING, ESPECIALLY WHEN NO ASSISTANCE IS AVAILABLE, OR TO
REACH A FREE STANDING PILING AT A GREATER DISTANCE WHEN USED WITH A TELESCOPIC
POLE. |
ROPE
INFORMATION:
- This product will work with both braided and twisted
nylon lines, provided they are soft; however, braided lines are preferable.
- Bring your new Docking Fork with you when purchasing new line to assure its
adhesion to the fastener strips.
-
NOTE: if your lines have become hard and stiff, wash and tumble dry (low) to
soften. (Never attempt this procedure with polypropylene or similar type
plastic-based lines - these lines will NOT work with this product).
| TO
USE YOUR LOADED DOCKING FORK:
-
1. Make sure the loose end of the dock line you have loaded is secure.
Extend the pole out to the necessary length to place your line around or over
the piling, stantion, cleat, etc...
-
2. When the line is firmly around the object, simply pull the docking fork
away while keeping it HORIZONTAL, and pull the line taut. Make your adjustments
at the cleat of your boat and you are done!
-
(Be sure you are able to handle the unit in its extended position with
the line loaded. Practice handling the docking fork before employing its use in
a docking situation. Lightweight telescopic poles are recommended for ease in
handling).
|
TO
LOAD YOUR NEW DOCKING FORK:
-
1. Install your docking fork to the threaded end of a telescopic pole.
-
2. Place HORIZONTALLY on a secure surface of your boat with the fastener
strips FACING UP.
-
3. Using the eye (already in one end of your line) as a starting point,
firmly attach it to the fastener strip on the HANDLE.
-
4. Attach the line in a clockwise fashion to the fastener strips around the
docking fork. Follow the shape of the docking fork bridging the gap at the top
of the unit as you go around, until the line is back at the handle.
-
5. Put this THROUGH the EYE and pull it until it is snug. You are ready to
go!
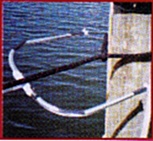
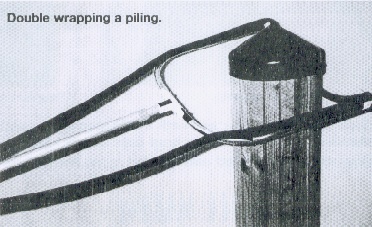
| DOUBLE
WRAPPING A CLEAT OR PILING:
(To facilitate an easier removal of your line from
the cleat or piling.) See photo below.
-
1. Find approximate mid-point of the line.
-
2. From that point, attach the line to the bottom left fastener strip.
Proceed to the top left fastener strip and attach the line, then bridge the gap
at the top of the fork connecting to the top right fastener strip. Attach the
line now to the bottom right strip and you are ready to go.
-
3. Follow the instructions above, to use your loaded docking fork.
When you are ready to leave your dock, simply disconnect one of the two ends
from your boat and pull the attached line in until you are free.
|
 |